Wednesday 14 September 2011

Bhindi ki sabzi or stir-fried okra

The first Indian recipe of my blog is dedicated to my favorite vegetable: bhindi (okra or lady's finger in English)! However, as it is not so easy to find them in Europe, let me add that you can use beans (cornetti) or zucchini, or any other vegetable instead.


What you need:

  • 250 g bhindi (or other vegetables)
  • 2 medium potatoes
  • 2 tomatoes
  • 1 tsp cumin seeds
  • 1 tsp mustard seeds
  • 1 dry red chilly
  • 1 big onion, finely cut
  • 1 clove garlic, minced
  • 1 tsp fresh ginger, grated
  • 1 tsp garam masala (or any "curry powder")
  • 1 tsp turmeric powder
  • 1 tsp cumin powder
  • 1/2 tsp red chilly powder
  • 1 tsp coriander seeds powder
  • 1tbsp vegetable oil
  • salt 
Wash and cut the bhindi in 1 cm long pieces (cut away the tip and the end of the vegetable), peel the potatoes and cut them in same sized cubes.
Heat the vegetable oil in a frying pan and add the whole spices (cumin seeds, mustard seeds, red chilly). This time I also added some "kalo jire", which has a very nice taste, but I don't know it's name in English. If you don't have these seeds you can skip this step, but the dish will lose some flavor. Cumin seeds should be available in Switzerland too, otherwise you can ask my mother, she has some left :). Fry the spices till they start to splutter and then add the finely chopped onion, followed by the minced garlic and ginger. Let it fry until it becomes lightly brown.

Now add the diced potatoes and fry them for 2-3 minutes, then add the bhindi and repeat the process. Bhindi is a bit gluey, but while you cook it it will lose this strange texture. While frying the vegetables add the powder spices and the salt, if you have all the ones I mentioned it's perfect, otherwise you can use any "curry powder" and some chilly powder...that will also do!


Cut the tomatoes in slices or cubes and add them to the vegetables, add half a cup of water at the same time and simmer with the lid on for 15 minutes or till the potatoes are tender. Then simmer it for few minutes without the lid so that it dries up. The texture of the vegetables should be quite dry, this preparation does not have a real "Indian curry" kind of gravy.

I love to have this sabzi with chapatis, but it is also very good with Basmati rice.

Enjoy!


Wednesday 24 August 2011

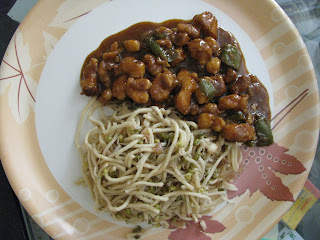
Trying my hand at Chinese cuisine: garlic chicken and hakka noodles with moong sprouts


Cooking Chinese food... this is a completely new experience for me. I have been enjoying hakka noodles and multiple varieties of chicken here in Delhi, but, till last weekend, I never cooked anything Chinese, or Indianised-Chinese, as some people might define it. 
So I started the recipe search and found a very simple garlic chicken recipe on http://allrecipes.com/Recipe/chinese-garlic-chicken/detail.aspx which I spiced up a bit according to the content of my fridge. The inspiration for the hakka noodles came from http://sproutpeople.org/recipes/entrees/sprouts_in_garlic_butter.html (Yes, I have started growing my own sprouts, and will write about it soon). The recipe is for "sprouts in garlic butter", which can be used as a tasty sauce for noodles or fried rice. 

Now, let's start with the chicken, you will need:

  • 500 g boneless chicken cut in bite-size pieces
  • 1 tsp salt
  • 1/2 tsp pepper
  • 3-4 tbsp flour (maida)
  • 2 tbsp peanut oil (or vegetable oil)
  • 6 big garlic cloves, minced
  • 2 capsicums
  • 3 tbsp Chinese cooking wine (I didn't have it, so I used Rum... other alternatives are Gin, other white wine, apple juice)
  • 2 tbsp Soy Sauce
  • 1 1/2 cups chicken stock (boil water with Maggi cube)

After cutting the chicken to bite-sized pieces season it with salt and pepper, then toss it in the flour, until it is nicely coated.
Heat oil in a frying pan and fry the chicken for 3-5 min, till it becomes lightly brown. Next add the minced garlic and the capsicum, fry it again for 5 minutes.
The final step is to add the wine, soy sauce (not too much as happened to me, that's why my version is so brown!), and chicken stock. Let it simmer for around 20 minutes and here it is!

Now coming to the noodles, it is all about the tasty "sprouts in garlic butter"! I used my first moong dal sprouts for it. 

Here is what you need:
  • 2 tbsp butter
  • 2 tbsp vegetable oil
  • 2-3 big garlic cloves, minced
  • 1 large onion, chopped fine
  • 1 small chilly, or jalapeno, minced
  • 2 cups of sprouted moong dal (or other sprouts)
  • 3 tbsp of chicken/veg broth (boil water with Maggi cube)
  • sprinkles sesame oil

In a Wok (or karai) heat 1 tbsp butter and the vegetable oil, add the onion, garlic and chilly, sauté for 1 minute. Subsequently add the sprouts and sauté for another minute or two. 
Add the broth and reduce the heat. Let it simmer for few minutes, or till the broth dries up to the level you desire. Remove from the heat, add the rest of the butter and sprinkle with sesame oil. 

Now you only need to boil your noodles in salty water for few minutes and then mix everything together.

Sunday 21 August 2011

Marble cake: a sweet meeting of chocolate and vanilla


The visit to a friend's house yesterday night was the occasion to try out a new cake recipe. I have always liked this "classic" of cakes, the marble cake, but never tried my hand at it before yesterday, and the result was appreciated by all the friends at the party.
I got inspired by the recipe on this italian blog, http://zirela.blogspot.com/2010/01/plum-cake-marmorizzato.html, but then I slightly modified it, as usual.

Here are the ingredients for a 28 cm long cake pan
  • 150 g unsalted butter (this is always a challenge in Delhi, so I changed it to approximately 1 dl of vegetable oil).
  • 250 g flour (maida)
  • 200 g sugar (powder sugar is the best)
  • 4 eggs
  • 2 1/2 tsp baking powder
  • 2 dl milk (I used low fat cow milk)
  • 40 g cocoa powder (for example Cadbury)
  • 2 tsp vanilla sugar (the brand is called Keya, you will find it in the spices section of Big Bazaar).

In a bowl mix oil/melted butter with sugar, vanilla sugar and eggs. Then add the flour and the baking powder, followed by 1 dl of milk. Mix well to make a smooth and creamy dough.
Prepare your cake pan, either by putting a parchment or baking paper into it, or by greasing it with a small amountt of oil or butter. Further you can dust it with maida flour for best results. I prefer using baking paper, because that makes it really sure that nothing will stick to the pan. However, I don't know yet where to buy baking paper in Delhi, but I have a multiple use paper from Switzerland for the time being. If anyone know a place where to buy it, please let me know.


Now pour half (or even a bit more) of the dough into your prepared cake pan. Then mix the cocoa powder with the remaining milk and add it to the other half of the dough. The last step is to pour the chocolate dough on top of the first one, then with a spoon you can delicately mix the whole mass, so that you get a nice "marble" design inside your cake.


Bake the cake at 180°C for 45 minutes on the middle grid of your OTG oven. Do not open the lid during the process because the cake will collapse! To check if the cake is ready, insert a toothpick or a knitting needle into  it. If it comes out clean, with no dough sticking to it,  your wonderful marble cake is ready!
 

Thursday 18 August 2011

A good tip for a lazy sunday morning: Pancakes!!

This is the latest recipe I added to my list, nothing really special or original, but so yummy...pancakes! They are quite similar to french crèpes, but they blow up nicely and become fluffy. The good part, compared to crèpes is that you need to make only 1-2 per person. This means much less time spent in the kitchen and more time to enjoy your food :)

For 4 pancakes you need: (4 of them was largely enough for 2 of us)

  • 2 cups flour (maida)
  • 2 1/2 tsp baking powder
  • 3 tsp sugar (if possible powder sugar)
  • 1/2 tsp salt
  • 2 big eggs (I used 4 small ones)
  • 1 1/2-2 cups of milk
  • 2 tbsp melted butter (I used sunflower oil instead)

Mix all dry ingredients, i.e. flour, baking powder, sugar and salt, in one bowl. In another one mix the liquid ones, the eggs, the milk and the oil. Then put everything together and mix well. There should not be any crumbles in it, it must be a smooth creamy dough.
Now heat some oil or butter in a frying pan and put 1/4 of the mass into it. Let it cook on one side till it makes bubbles and becomes dry on the sides. Then turn it around, trying not to splash the liquid part of the pancakes all over the kitchen :). Leave it for 1-2 minutes till it is lightly brown on the lower side also. Do the same with the other 3 pancakes.

This is all about it. Mainly you need to work the ingredients quickly, because the baking powder starts its effect as soon as it becomes wet. So if you wait for too long with the frying, the pancakes might not blow up properly anymore. And do not try to turn the pancake to early, it will splash all around.

You can have your pancakes with maple syrup, as the tradition wants it, but it is quite expensive here in India, so we had them with honey, strawberry jam, chocolate sauce... other suggestions are sugar and lemon or sugar and cinnamon, nutella, etc...the typical fillings of sweet crèpes! I imagine rabri or something similar would also go quite well on top!

One of my big favorites: Melting chocolate muffins (french style)

This is one of my personal favorites, chocolate muffins with a melting heart. In french they are called "fondants au chocolat" or "moelleux au chocolat". This recipe is taken from the book "Chocolat!" by Heloise Martel.
This recipe is very easy and fast to make, especially if you melt the chocolate in the microwave as I will explain below. Some additions can be made to the basic version of the muffins. The most interesting one I found is to add a square of white chocolate in the middle of the muffin before baking it. It gives it a surprise touch!


What you need for 4 muffins is:
  • 100 g dark chocolate (64% cocoa is the best)
  • 2 eggs
  • 40 g flour (maida)
  • 80 g sugar (powder sugar is better but not essential)
  • 60 g butter (it should be non-salted butter or margarine. In alternative you can use sunflower oil. Be careful to add some more flour to get the right consistency, it should not be too liquid).

Break the chocolate into small pieces in a vessel, mix it with the butter and add 1 tbsp of water. Then put it in the microwave for 1 minute , till it melts. (You can also do the melting in a pan, but the microwaving is much simpler and quicker).

In a bowl beat the eggs with the sugar, until the mix becomes white and bubbly, then add the melted chocolate and the flour.

Prepare 4 muffin molds as instructed by the manufacturer (here I use paper ones, but there are also silicone or metal ones) and fill them with the muffin mix. If you want to add some white chocolate in the middle, fill half of the mold, add the white chocolate and then fill up the rest.

Put the muffins in the refrigerator  for 1 hour. This makes them firm and their shape will be nicer. Then bake them in the OTG oven for 8-10 minutes at 210°C. Place them at middle height and use upper and lower heat.

You can eat them when they are warm with some vanilla ice cream, or let them cool down and experience the full taste of the chocolate.

Bon appétit!

the pictures will be added the next time I make them :)

Welcome to Maya's World of Food

Hi there!!

welcome to my blog! I love cooking and trying out new recipes from all over the world. Right now I live in New Delhi with my husband, so I have to opportunity to try out Indian cooking, but also Thai, Chinese and Lebanese. Needless to say it is easier (and cheaper) to find the ingredients for these cuisines over here than in Switzerland. But this does not mean that I have forgotten my first loves, Italian food and cake baking!

My recipes are easy to make and usually quite fast also, as in the Delhi summer you don't want to stand in the kitchen for hours... The ingredients are adapted to the Indian context, as some of them are difficult to find over here. For example instead of beef I use mutton (or chicken), instead of parmesan, cheddar, and so on. I consider this as en enrichment to my cooking more than a fault, it makes you more flexible and you discover many more interesting flavours!


But now let's get started! And Buon Appetito!